Table of Content
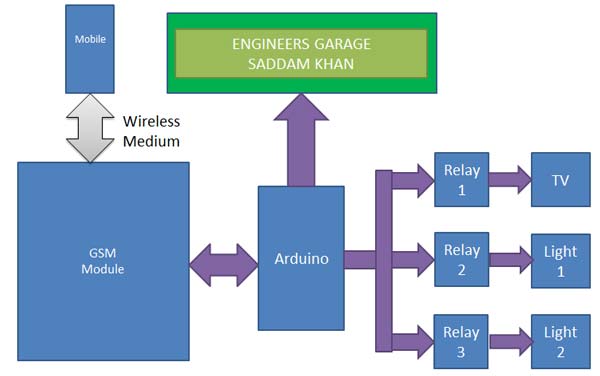
Since we're compiling a few things on the Pi itself, be warned that this entire process will take a long time. I would say go make yourself a cup of tea - but when I say a "long time", I mean the best part of a day - so 178 cups would be more appropriate. The Raspberry Pi will act as the brains and the gateway of operations - it will run a Node app, tied to a Mongo database, and serve the front-end interface to any web browser. Visit our home page to learn more about how Arduino works and the many different projects you can build with our solutions. Jose Luis Bejarano Vasquez built a project to help users control their TV, DVD, and audio system using Arduino and an Android app.
The readings can be displayed on gauges and charts on Node-RED UI. You can control the ESP32 and ESP8266 boards via MQTT from Node-RED. Skyfi Labs gives you the easiest way to learn and build this project. After many hours of debugging the code, I found single digit pin numbers weren't working - make sure your transmitter is placed on pin 10 to be sure.
What’s inside the eBook?
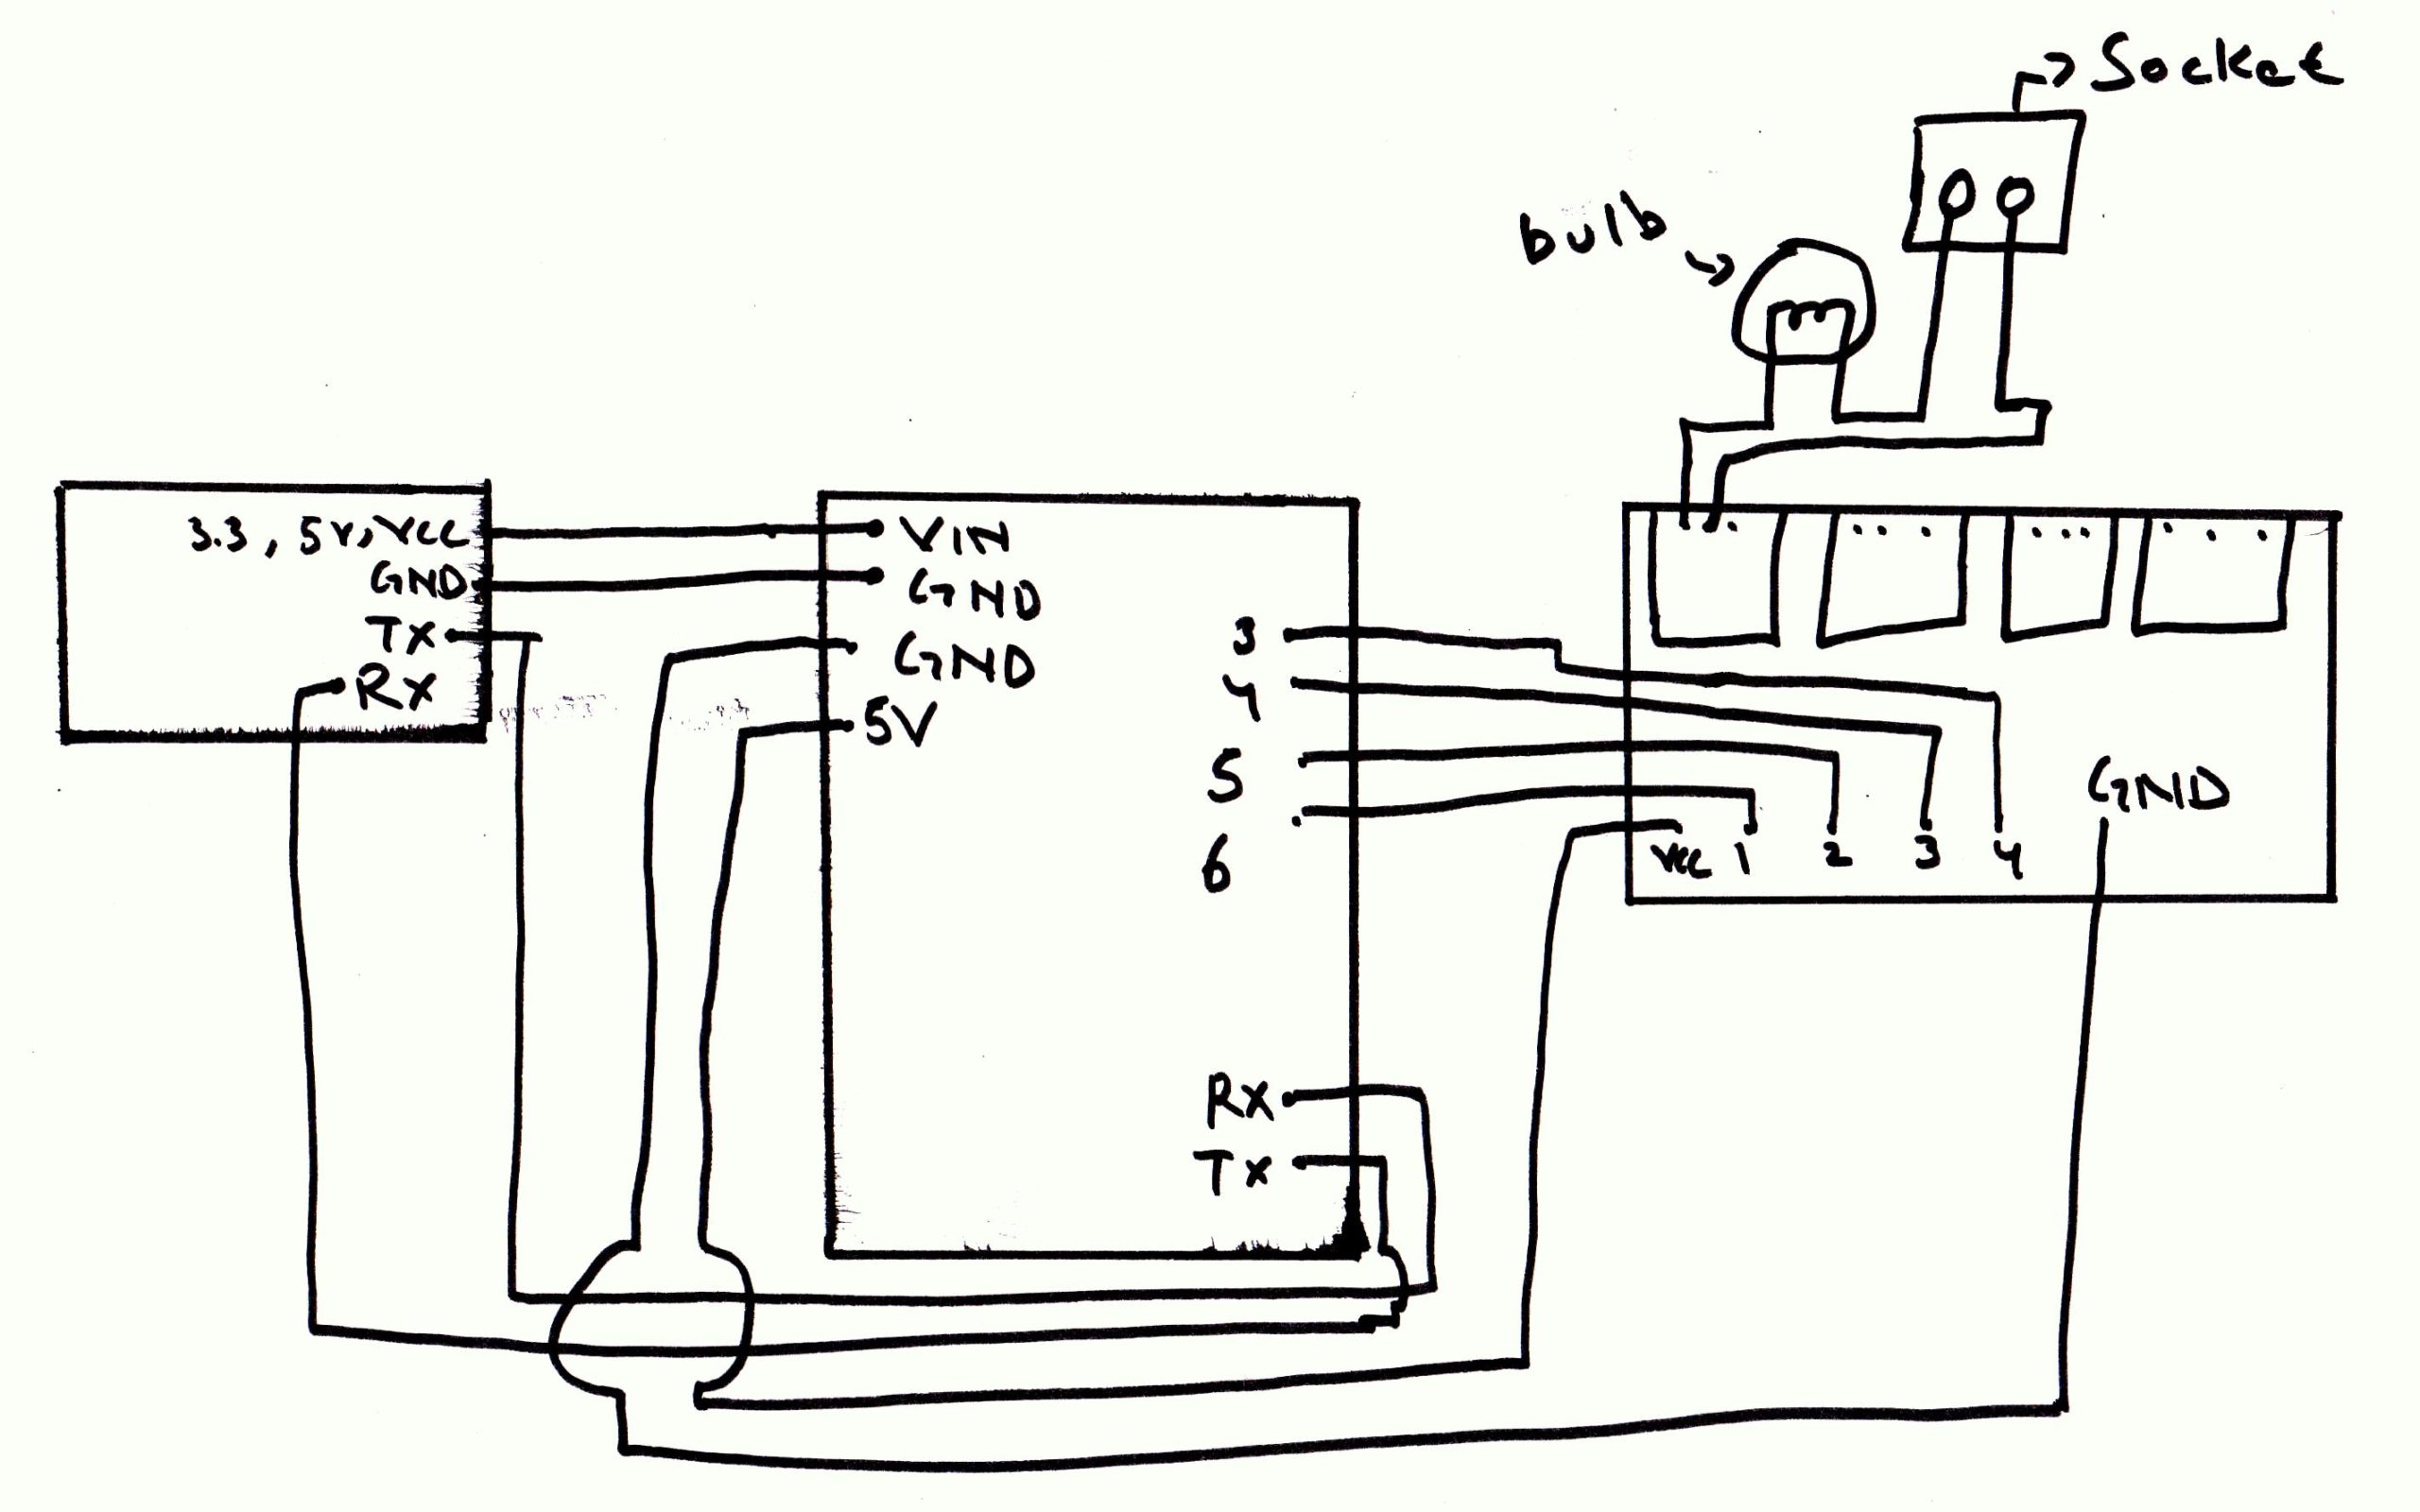
Exercise and entertainment can be a perfect combination, with devices like the Peloton gaining lots of popularity in recent years. It can control the lights, windows, doors, and many other things in your house. The NodeMCU system is easy to install and use, and it’s compatible with a variety of home automation devices and appliances. Using the above setup, you can turn any device into a smart device that can be controlled from your smartphone. 2) Next, connect the IN1 pin on the relay module with PIN 4 on the Arduino. As shown in the circuit diagram, we’ve connected a 1k ohm and a 2.2k ohm resistor across the GND and TXD pins on the Arduino.
Needs to review the security of your connection before proceeding. Smart homes have many benefits, and it’s not all about convenience, security, and chores. Entertainment is a big part of what we do at home, and smart technology can help us maximize our enjoyment of our home entertainment systems and manage them more easily.
TV, DVD & Audio Control From Android and Arduino
Node-RED allows you to create awesome automation flows without having to write code. So, it is super accessible, specially for those not much keen on writing code. In this Module, you’ll learn how to automatically set all GPIOs to a defined state using master switches and modes. You’ll also learn how to trigger events when something happens (a notification, a threshold value, etc.) Finally, you’ll learn how to set timers and schedule events.
I'm going to leave it here at this point, but sensor readings and IR remotes are also supported. I'll probably revisit these at a later date with some more enhancements. If this has all been a little too complex for you, perhaps check out these beginner-friendly Arduino projects.
Step 3: Step 3: Schematics
3) Once you select the device, you’ll be connected to the HC-05 transceiver. The app will now prompt you to enter the mode that you wish to use. We want to turn on the bulb only when we send a signal from smartphone. If you have a multi-channel module , you can connect IN2, IN3 … In with different digital pins on the Arduino, and repeat the steps below for configuring the other pins. We don’t use the STATE and EN pins on the HC-05 module, since they are not required for this setup. The HC-05 is powered using 5VDC but includes an on-board voltage regulator that generates a 3.3V supply to power the transceiver.
By using this app, you will be able to monitor and control the home appliances from any part of the world with ease. Combined with an Arduino and some off-the-shelf remote control sockets, it makes controlling AC appliances easy. You can add temperature sensors, and even control your TV - but we'll be keeping things basic today and extending the project in a later tutorial. You can sync entertainment devices with other gadgets like voice control tools and even exercise machines to create a more user-friendly and feature-rich experience.
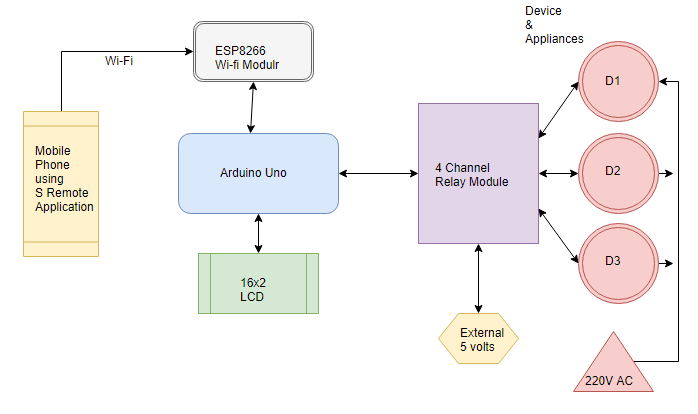
This can include tasks such as turning on the lights when you enter a room, or setting the thermostat to a certain temperature. Home automation systems can be as simple or as complex as you like, and there are many different products on the market to suit different needs. In this tutorial, we will show you how to build a simple DIY home automation system using a NODEMCU and a few other components. You can monitor and control your home’s energy usage, security system, and much more. For this application we’re using a relay module which includes the relay drive circuit allowing it to connect directly to a microcontroller GPIO pin. The device can also be connected to an Android App which you can develop on your own using some applications like MIT App inventor etc.
You can now build a home that is more enjoyable to spend time in for you, your family, and any guests you have over. The good old-fashioned pinball machine is a tried-and-tested form of entertainment, a staple of arcades and bars the world over. In your home, a pinball machine can be the perfect way to entertain guests or even just keep yourself busy. When you set up the device, it will open Firefox and start playing Netflix. The bike will monitor your speed according to a routine you designed, and if you fall below your desired speed for too long Netflix will pause until you speed up again.
3) Connect the TXD pin on the HC-05 module with the RXD pin on the Arduino. The core hardware is rather simple and only consists of an Arduino microcontroller kit, a Bluetooth wireless module, and a relay. We will need a variable to store the message received by the HC-05 module, and variables mentioning the pins to which the LEDs are connected. This project is an IoT-based home automation system, where you can control lights via Bluetooth. The plugin works by sending "tristate codes", but these will vary by manufacturer. We're going to use Raspian for this project, and I'd strongly suggest starting from a fresh install if you've previously performed other hacks and such.

Simply unplug the jumper wire connected to Pin 0 on the Arduino UNO , and re-attempt the code update. After you have successfully wired things up, the next step is to upload the code to the Arduino. If the red and blue LEDs on the HC-05 are blinking, then you have successfully connected the Bluetooth module with the Arduino. This is called a resistor divider because it divides down the input voltage. We obtain the 3.3V level signal from the intersection of these two resistors. This connection will form the second half of the two-way communication and is how the Arduino sends information to the HC-05.
If the connection is successful, we show an alert, saying that the connection was successful. Control and monitor the home environment using Android app with advanced features such as voice command, scheduling, home preparing itself. Sir,I am trying to make that project from previous 7 days continously but I can't able solve solve coding problem .Please send me whole genuine code to resolve my problem please. I’m Sara Santos, and I work with Rui at Random Nerd Tutorials. I have a master’s degree in Bioengineering from FEUP, and I’m the co-author of the “20 Easy Raspberry Pi Projects” book. I’ve also written several eBooks with Rui related to ESP32, ESP8266, Firebase, and much more.
All you need is an Arduino Board, some relays and an android phone. In this section, you’ll learn how to add an ESP32-CAM surveillance camera to your Node-RED home automation system. The ESP32-CAM is a development board with an ESP32-S chip, an OV2640 camera, microSD card slot and several GPIOs to connect peripherals. This Module explains how to set up a Cloudflare tunnel to access your Node-RED home automation system and InfluxD monitoring dashboards from anywhere. The main objective of this project is to build a smart home device which can be used to control the home appliances via internet. The home automation device that you build can be integrated with almost all the home appliances and can be used to control them remotely from any part of the world.
We provide instructions for installing Node‑RED, InfluxDB, and Mosquitto broker on Digital Ocean . Node-RED can send the sensor readings and any other data to InfluxDB . You can learn from experts, build working projects, showcase skills to the world and grab the best jobs. James has a BSc in Artificial Intelligence and is CompTIA A+ and Network+ certified. When he's not busy as Hardware Reviews Editor, he enjoys LEGO, VR, and board games. Before joining MakeUseOf, he was a lighting technician, English teacher, and data center engineer.


No comments:
Post a Comment